A LOT of fabrication goes into creating the smoothed-out engine bays you’ve seen in Street Machine over the years. In this two-part article, we’ll give you a little insight into what’s involved, starting this month with how to fabricate a flat firewall.
STEP-BY-STEP
STEP 1. This 60s Galaxie’s firewall is a bit messy, so instead of trying to weld up holes and even things out from side to side for a symmetrical look, we decide to just remove the whole lot and start from scratch.
STEP 2. Working neatly along the edges with a 1mm cutting disc on a five-inch grinder and an air hacksaw, the whole firewall is quickly removed in one piece. The vehicle’s front panels are then refitted to work out the alignment and clearances for the new inner guards we’ll make later on. Not all vehicles are going to have a bolt-on front clip like this one, but the basics remain the same.
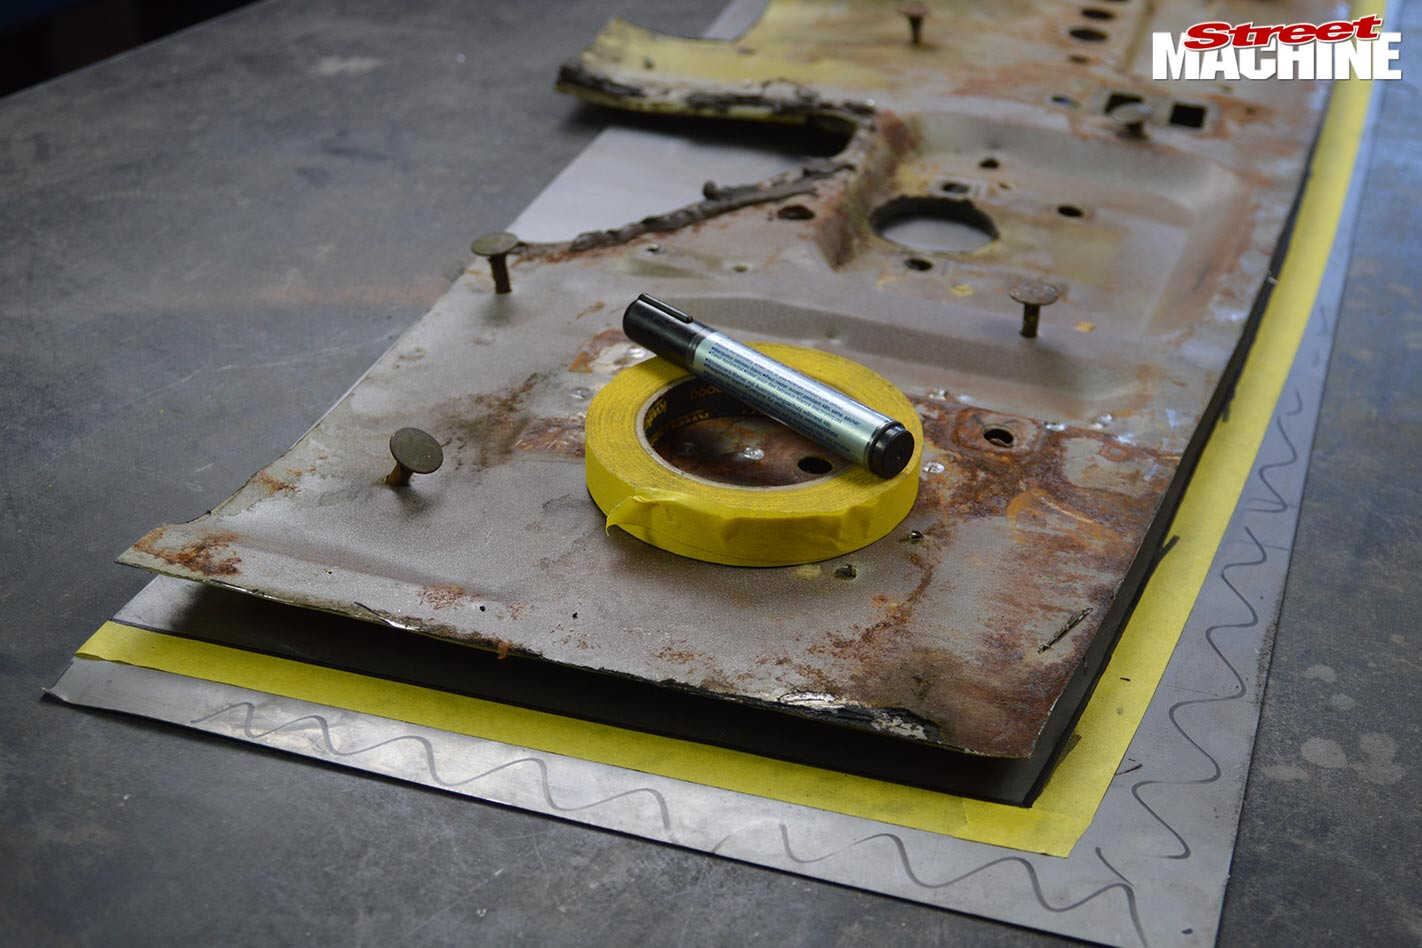 STEP 3. The old firewall is laid face-down on the bench and used as a template. We carefully trace around the edges onto a piece of sheet metal, and some 18mm tape is then added around the perimeter of the trace to allow for the edges that will be folded.
We will make this panel in two pieces: a left and a right part, to be joined down the centre.
STEP 4. With both pieces cut out (allowing a little extra material on each end where they will be joined together), they are laid on top of each other to check that they mirror one another. A design to be bead-rolled is then laid out, taking into consideration things such as the booster/master and steering column, as we don’t want any of these to end up in the middle of a bead. Then it’s into the bead roller for some much-needed strength and character.
STEP 5. Sometimes you have to think five steps ahead and work backwards in order to get things to work. In this instance, we need to roll the firewall beads to match the new inner guards, which do not yet exist. So some inner guard frames are mocked up with rod to use as a template for where the beads on the firewall need to be rolled.
STEP 6. Once the bead rolling has been done, the edges we marked with tape earlier are bent/tipped at 90 degrees. Both pieces are then fitted and clamped to the vehicle, allowing the ends to overlap in the centre. One advantage of making this panel in two sections is that we can now adjust each piece to get them to fit perfectly.
STEP 7. The centre is marked and the excess material from both panels trimmed, best achieved using a scribe and a 1mm cutting disc. The two panels can now be tacked together while still in the car and then removed. TIG welding takes place back on the bench, and we now have a one-piece firewall.
STEP 8. The factory bellhousing recess and tunnel isn’t going to work anymore. The fact that it has been crudely patched with tin, screws and silicone is reason enough for a new one to be fabricated at the same time as the new firewall. Some card is used for a template, then transferred onto metal.
STEP 9. While an area could have been recessed for the master cylinder, it wouldn’t have contributed to the look we were after. Thankfully, there are numerous aftermarket set-ups that allow the brake master to be relocated under the dash.
STEP 10. The one-piece firewall is fitted back into place. The front panels can once again be removed and the alignment of the new trans tunnel sorted out. The lower part of the existing firewall can also be given some attention before things are ready to weld.
SO HERE IT IS:
A fairly basic yet effective firewall. Internal bracing to support the bonnet hinges will also be added, along with all the other bits to finish up the job. Tune in next month as we complete those, and fabricate a pair of custom inner guards.

Comments