More cars in your head than you’ll ever have time to build? Here’s a way to do ’em
This article on model cars was originally published in the August 2012 issue of Street Machine
MANY people think building models is kid’s stuff. They’re sort of right — I built my first one when I was nine or 10 and not only was it great fun but I actually learnt something. By reading the instructions and gluing all those little pieces of plastic together — usually with way too much glue — I learned to identify engine blocks, heads, intake, exhaust, gearboxes and brakes.
Over the years I got better at making them — all that time spent avoiding my homework paid off. Eventually I progressed to painting the models and adding more detail, such as sparkplug wires and brake lines, and I built up quite a collection, though not as large as some people I know.
My father would always ask why I was wasting my time with “all those stupid toys” but check it out, Dad — I’m getting paid to build a model!
This article isn’t a review of GMP’s ultra-cool ’32 roadster kit, more of a general how-to with some handy tips on model building. Being a die-cast kit with several plastic parts, the basic principles are much the same, you’ll just need a small screwdriver to fit up some of the parts.
HANDY TIPS:
1. The box is usually more than just a vessel to hold all the pieces. The designs are known as box art and people often keep the boxes long after the models have been built — the pre-aged, retro-looking GMP packaging is certainly a keeper. I prefer boxes that show the actual model and not just an artist’s impression of what the model might look like when finished.
2. Quality models have a lot of parts, not all of which are used, so it’s a good idea to familiarise yourself with everything before commencing. Die-cast models have become much more popular over the past decade. I prefer the traditional plastic versions as they allow me to mix ’n’ match parts so my models aren’t exactly the same as everyone else’s, though it’s a lot more work.
3. Here are a few of the tools you’ll need. Clockwise from top left: side cutters, scalpel, razor saw, dentists’ tools, tweezers, hand drill, jewellers’ screwdriver, various glues, paintbrushes, files, and toothbrush. As for paint, many modellers use an airbrush but you can get great results with a pressure pack. The acrylic Tamiya paint (there are other brands) comes up nicely with a colour sand and polish.
4. Regardless of the model, it’s imperative that you read through the entire instructions before commencing. Doing so will give you a clear understanding of how the model goes together and help in determining which parts require painting and which don’t. The manufacturers of this kit expect you to use your imagination and modelling experience for assembly, so the instructions aren’t detailed or prescriptive.
5. It’s neater and safer to use a set of small side-cutters to remove the parts from the tree (sprue). Using a knife to cut them out or trying to twist them free may lead to the parts becoming damaged, especially the smaller pieces. When snipping, double check that you’re not cutting off a portion of the actual part as quite often there are protruding tabs to allow them to join to other parts.
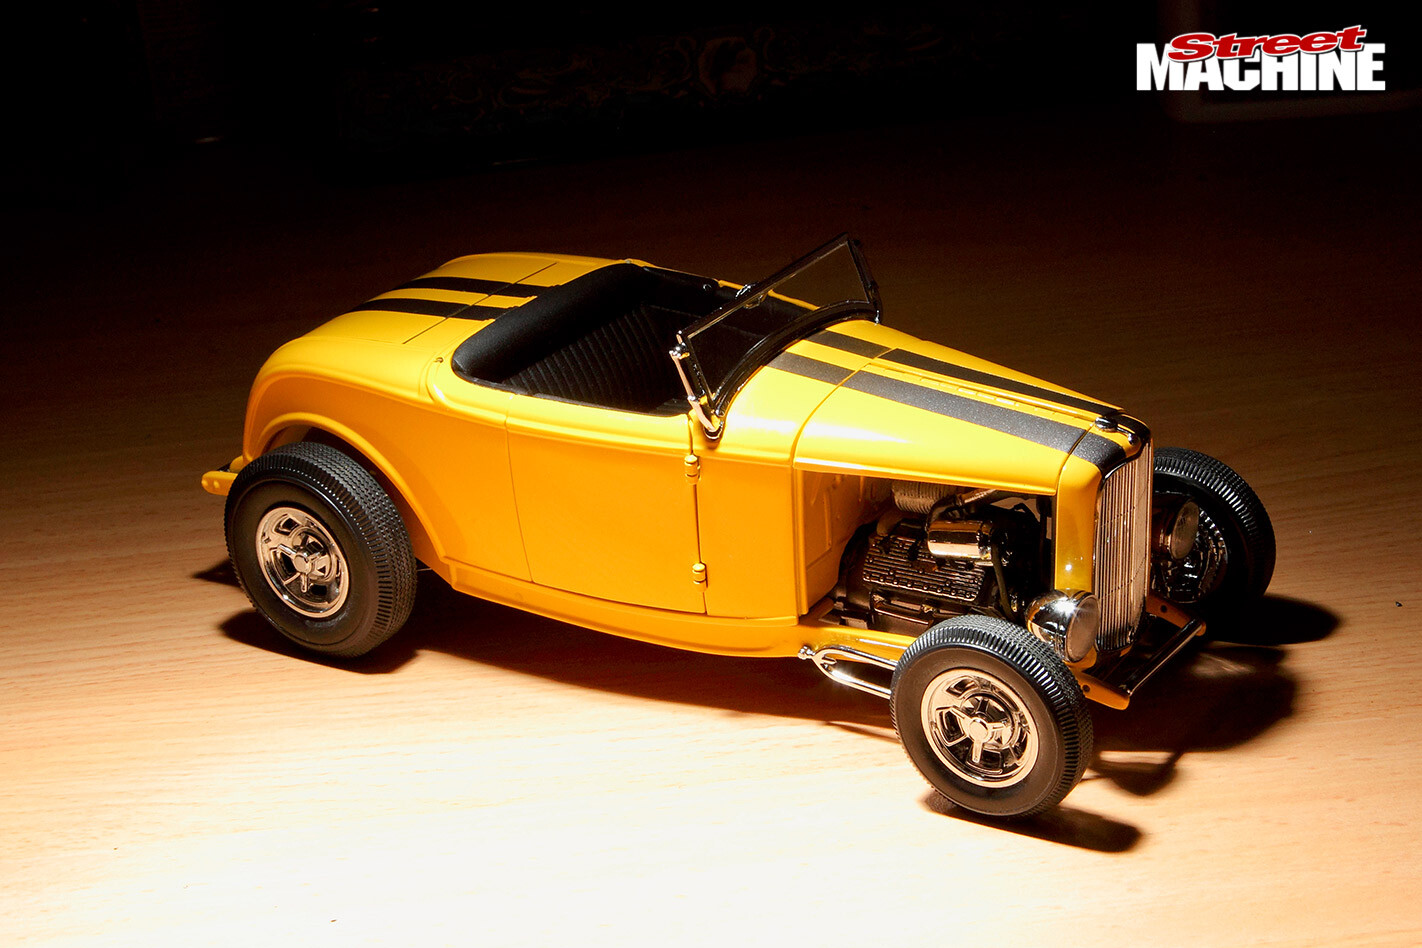
6. Most kits come with at least a couple of options with regards to appearance, including wheels and tyres. In this case you get some smooth chromies with centre caps (which you could paint if so desired) and a set of traditional-looking Halibrands. There was also a choice between regular or wide whitewall tyres. As we were looking for more of a 60s style with our highboy, the Halibrands and blackwalls won out.
7. Any plastic parts that are going to be painted need a bit of a scuff with 400-grit paper before painting. This helps the paint stick to the plastic and also shows up low spots. Some of these low spots will sand out, others might require a bit of modelling filler. It’s just like prepping a real car for paint, really. The top of the 32’s grille shell had two spots that needed filling and smoothing.
8. It’s vital to thoroughly wash everything before painting as the moulded parts will have a coating of release agent on them. Also, if you’ve been handling the parts, you’ll have left your greasy fingerprints behind. A bit of soapy water and a good scrub with a toothbrush will do the job. Don’t handle parts after washing and make sure they’re dry before painting. A quick blow with compressed air can help chase away residual water.
9. An old modeller’s trick to add more realism and detail to a part is a process known as black washing. Using thinned down black paint, you simply touch it to the part and because the paint is watery, it runs into all the low spots. This technique worked exceptionally well on our ’32 grille insert, and is equally good for many other parts where you want to enhance the details.
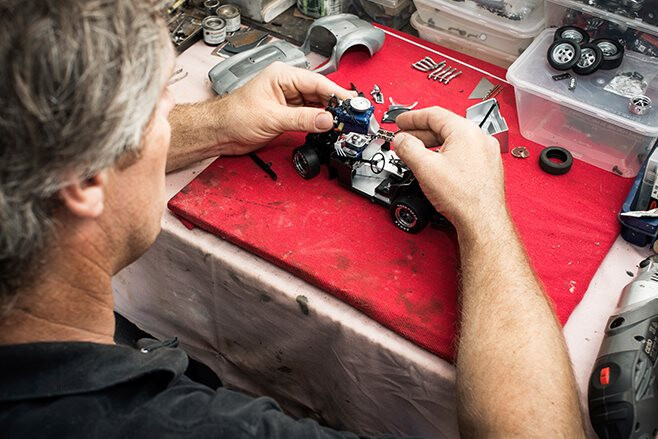
10. The engine required final assembly before being dropped between the freshly painted rails. This included affixing the chromed Edelbrock heads and twin Strombergs. Gluing chrome parts is a trap for novice modellers. Most instructions tell you to remove chrome from the surfaces to be glued. It’s good advice as the glue really doesn’t stick to the chrome at all — I recommend using a sharp scalpel to scrape it off.
11. Mock up the model several times as you go to check that everything looks right and the stance is good — it’s bitchin’ on the GMP ’32 highboy. You should also check parts fitment, especially if you’ve been swapping parts with other models (kit bashing) or you’ve strayed from the standard build options. This kit comes with optional guards; after trial-fitting them we decided to stick with the fenderless look.
12. Our colour scheme included a pair of gunmetal grey skunk stripes right down the centre — time to break out the masking tape. Tamiya offers a low-tack masking tape which is quite flexible and can be cut to thinner widths if necessary. Unfortunately it’s yellow and hard to see here. Warming the paint when spraying in cold conditions helps it flow on better. A few minutes in a pot of hot water does the trick nicely.
13. Most people are unaware they have a model spray booth right there in their home. It’s kitted out with heat lamps, extractor fans, good lighting and you can wet the floor to keep the dust down — it’s your bathroom! The gunmetal grey was laid down quite thinly so as not to leave a ridge on the masked edge. And no, I didn’t paint it on the shelf — this spot was just the perfect drying location, right under the heat lamps.
14. It takes around 30 minutes for the paint to be dry enough to touch, which is the ideal time to peel off the masking tape. Pull the tape back on itself so as to minimise the risk of lifting the paint or tearing the edges. This was without doubt the most difficult and stressful part of the build. At first I was a bit sceptical about the grey on yellow paint combo, however in the end I think it turned out looking pretty good.
15. Interiors are an important part of any model and central to an open top car. This GMP kit included an intricately detailed interior complete with printed gauge faces and a really nice dash insert that featured an engine-turned fascia — usually the gauges are moulded in and you have to pick out the details with paint. The four-spoke Bell wheel was the perfect finishing touch. The shifter? A piston, of course!
16. Another stressful part of any model build is fitting the glass. Normal model glue can mark the clear plastic, while super glue can leave a white haze on the glass which is difficult, though not impossible, to remove. Usually I use PVA or wood glue but this time I decided to try something a little bit different — a small amount of clear paint applied with a jeweller’s screwdriver. So far, so good!
SEAMLESS BUILD
Step one is putting the engine together. Using proper modelling glue that has a fine and precise applicator (pointy tip) comes in handy here, as there’s only a small mating surface between the two halves.
The glue applicators (as shown in Step 3 on the far right) are available from any hobby/model shop and aren’t expensive. Once the parts are cemented together, there’s usually an unsightly seam along the join (arrow, shown above). For a good-looking job, sand the seam with a fine-grit paper (400-600) and if necessary fill the join with modelling putty before undercoating the assembly. If you get the joint neat enough, the glue may work as a filler of sorts
PAINTING FRAME
As with the small parts, the body needed its own stand for painting — I also bent this up out of coathanger wire.
All the die-cast sections (main body, detachable doors, trunk lid and chassis) were already in primer, so I thoroughly washed them, let them dry and blew off any dust with a handheld lens puffer.
As with a full-size paintjob, it’s always good to lay down a light coat first to help the next coat stick. I’m impatient and bomb on the coats pretty wet, which can lead to runs. But hey, that’s why they invented sandpaper.
PART HOLDERS
The size and lack of weight in the many small plastic parts can make painting them extremely fiddly. Don’t worry — you can quickly and easily fashion specialised part holders that allow you to handle and rotate the parts as well as hang them up to dry.
All you need is a wire coathanger or two, a pair of pliers and some Blu-Tack. Cut 80mm lengths from the hanger then put 90-degree bends in one end and hard turns at the other — instant part holders.
The 90deg end attaches to the part using Blu-Tack; you hold or hang the part by the other end.
WRAP UP
Building the GMP kit from www.bongosbasement.com.au was a lot of fun. Options included three engines (SB Chev, Ardun flathead and our choice, a SCoT-blown flathead) along with two types of driveline and two suspension set-ups. The kit’s larger 1:18 scale (1:25 is traditional) also made life a little easier.
The overall quality is good, especially the primered die-cast body and the chrome plating, which was more robust than you usually find. My two main gripes were some of the parts had excessive flash (the extra plastic left over from the moulding process) and the poseable steering is overly fiddly.
I think GMP has really nailed the look of a classic highboy roadster. You can’t really stuff it up as it all goes together nicely and without many dramas. Although I didn’t keep a log, I probably spent 30-40 hours all up, including photographing the various steps. Hope you like it!


Comments