
This article was originally published in the February 2012 issue of Street Machine
MOST people find it easier to modify cars than to alter their habits and this is certainly true of Rod Hadfield. He’s a compulsive tinkerer and 2in-dropped Ford stub axles are one of his recent efforts. They’re from a company Rod’s involved with, Stubtech, which has branded its range of dropped stub-axles Aussie Axles.
As with its Holden versions, the Ford axles are locally manufactured from high-quality 4340 steel alloy in one solid piece.
One reason Stubtech offers dropped axles is to give owners a better way of lowering their cars than cutting springs, which often causes the suspension to bottom out and effectively creates a go-kart.
When a car rides on the bump stops, the suspension components are subjected to stresses they weren’t designed to withstand. Shock absorbers can be damaged, while firewalls, towers and sub-frames can crack from the stresses involved.
Even lowering a car by fitting springs and shocks that can resist the forces involved doesn’t guarantee the desired result. That’s because lowering a car this way changes the orientation of the factory suspension arms, which in turn alters how the car handles — often adversely.
These dropped axles lower Fords from XR to the XG ute by two inches (50mm) without any of the negative consequences just described. It can also be used on XK to XP models but note that the ball-joint studs are smaller so the holes in the uprights have to be modified.
Here, a set is being fitted up to an XC ute:
1. Securely support the vehicle on jack stands and remove both front wheels. To separate the steering tie-rod from the steering arm, use the correct separator tool rather than banging away at it with a hammer. A brake conversion is also part of the stub-axle swap (see Step 05), so after unbolting the brake caliper, remove the brake line and allow it to drain. Finally, whip the disc off.
2. Next to go is the old stub axle. With the top and bottom ball-joint nuts removed, insert the separating tool (they don’t cost much and are very handy) and expand it to push the upper and lower studs out of the stub axle. The side of the collar around each of the tapered holes for the ball-joint studs may need a sharp rap or two with a hammer to loosen the tapered fit before the spreader can separate them.
3. Here’s what can happen when a car is lowered by cutting springs. Once the suspension reached its travel limit, excessive stress was fed into the ball-joints — that bent the lower ball-joint stud. We’ve set the upper ball-joint to show how it bottoms out. The ball-joint on the other side had actually broken a couple of days before. Adding four new ball-joints is a recommended part of the installation.
4. Clearly the new stub-axle has to be tight — damned tight! Often these are just given a good rattle with an impact wrench but our advice is to obtain the factory manual for the model you’re working on and use the listed torque specifications. The axles are superbly made and accepted by the authorities throughout Australia and New Zealand. They also come with all the paperwork needed to keep engineers happy.
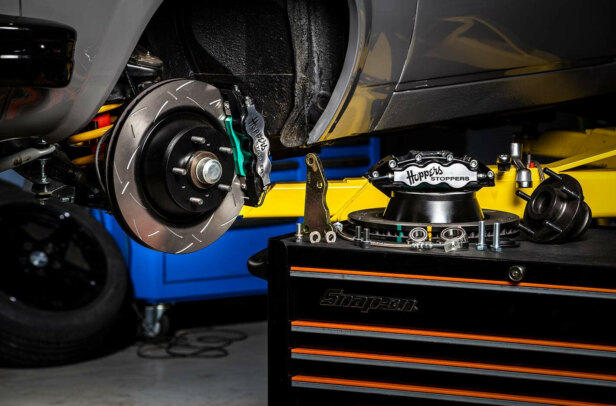
5. This clearly shows that the Stubtech’s spindle is 50mm higher, which lowers the car 50mm. The raised spindle height fouls the factory caliper’s top mounting bolt, which means a brake swap is necessary. Stubtech offers a variety of caliper adaptors to suit many different brake options — including original and larger-diameter rotors, along with later model multi-piston calipers. Give the guys a call to discuss options.
6. Torque specs for the caliper adaptor and caliper won’t be in your factory manual but they must also be very tight. The axles are made via lost-wax investment casting, which is known for high-quality, imperfection-free results — many stressed aviation parts are made this way. Vipac testing found the axles have high integral tensile strength and high ductility. This means they can bear high static and impact loads.
7. The kit is designed to use the original axle nut and retainer but you must always use a new split pin. Rod makes a point about packing wheel bearings properly, as he feels it’s often done inadequately. Grease has to be thoroughly pushed through every section of the bearing — using a proper packer is ideal. The best one I’ve ever seen can be viewed and ordered at www.bearingpacker.com.au.
8. Any caliper designed to work with a one-inch master cylinder can be used. Here are a couple of options: original calipers (rear); Series II AU (middle); BA (front). Stubtech does not supply calipers; you’ll need to source them new or used. A wrecker is a good option as you also need the original mounting bolts, flexible hose and the first couple of inches of hard line with the threaded fittings attached.
9. Chris, the ute’s owner, opted for Series II AU brakes. This is him fitting the passenger-side caliper. Chris fitted a couple of small turbos to the XC’s gas-fed Clevo for a healthy increase in low-end grunt. Even though it’s all over by 5000rpm, the factory brakes were marginal at best. The AU calipers combined with the existing DBA drilled and slotted factory-style rotors proved to be a significant upgrade.
10. Note how the calipers have been relocated from the rear of the disc to the front. This is necessary to gain adequate clearance to the stub axle’s upright but a benefit is that it allows greater caliper choice (each will require a custom adaptor block). The Stubtech axles incorporate the factory steering stops (the rectangular flat on the steering arm), so that the tyres don’t interfere with the guards on full lock.
11. While early Ford calipers used imperial threads on the brake lines, the later AUII and BA calipers have metric connections. Also, early Fords used double-flared brake lines where they connect with the flexible line, while later models used only single ball-flares. The easiest solution is to cut the end off the original hard line (not too much), swap to metric ball-style flare nuts and re-flare the hard line.
12. Flaring tools are quite affordable and they’re worth having for odd jobs like this — this one does double, single and single ball-flares. The outside diameter of the lines used on older and newer models is the same; only the fittings have changed. When you buy your calipers, try to get the retaining clips that hold the brake line in the bracket. Note that the kit retains the original bump-stop clearances.
13. The retaining brackets used to anchor the flexible lines to the body are different on later-model calipers. Use a soft drift to knock the hose end out of the original retaining bracket, then with the bracket held firmly in a vice, drill it out to take the larger later-model hose end. A step drill is better for this job than a standard twist drill as it’s less prone to jamming.
14. With everything bolted up, the brake system will have to be bled. The standard technique takes two; one pumps the pedal until bubble-free fluid emerges from the bleed nipple. This requires a bit of hose and a container to catch the fluid. The compressed-air activated bleeder allows one person to do the job. Either way, make sure the fluid level in the reservoir doesn’t drop below the minimum mark.
15. With the wheels on and pointing straight ahead, lower it to the ground and adjust the alignment. Rod made this gadget to perform basic toe adjustment and wheel alignment years ago. The far end is loosened to get it around the tyres and fitted to each wheel. Then it’s moved to the rear of the wheel and any gap is adjusted by winding the tie-rod ends in or out.
16. In testing, a BA caliper was fitted. Due to its beefier body it touched the car’s 15in wheels and needed the high points on the radial face to be relieved — it’s aluminium and was sanded back with a flapper disc. There were only a few problem high spots, so not much material had to be removed. Of course, this would not be an issue with 16in or larger wheels.
WRAP UP
As advertised, the XC dropped a full 50mm in the nose. There really isn’t a better way to get your early Ford sitting lower, handling better and looking good. With their greater pad area, the twin-piston AUII calipers resulted in a significant braking performance upgrade — with the BA option, you’d gain even more.
For the maximum benefit from the conversion you’d need to get your rear end lowered to match.
The Stubtech axles also fit US Fords of the same era, including Mustangs up to ’72, which is good news because they sit so high. Similar American products are made in three pieces then assembled, so the Aussie one-piece versions should prove popular over there. It’s nice for Ford fans to finally get something that’s been available for other classics for years.
You can call Rod on (03) 5472 3868.
Comments